

Apart from one naval engagement between British and French warships in Algoa Bay, Port Elizabeth has been spared the horrors and depredations of war. Compared with other naval engagements such as those in the Pacific Ocean during WW2, this one can justifiably be rated as minor.
Having said that, during this Napoleonic era, with tensions between the dominant maritime nation, Great Britain, and the pretender to the “throne,” France, being white hot, any misstep in the southern oceans placed the British position on the Indian subcontinent in danger.
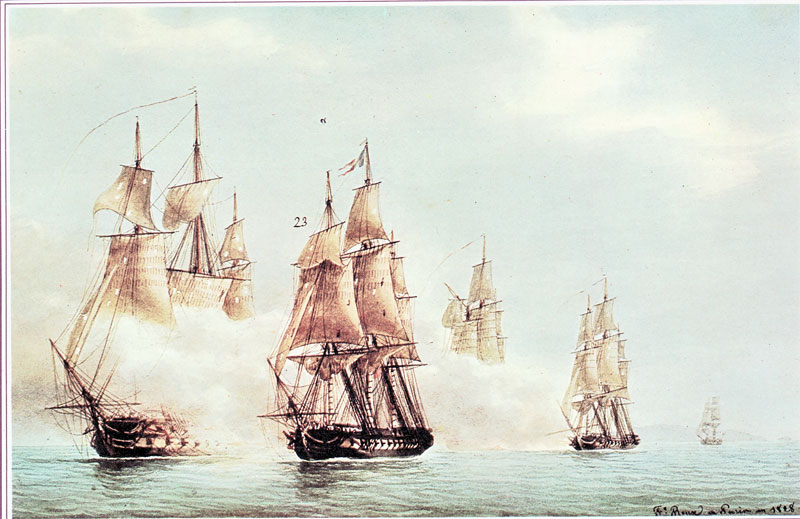
Main picture: Fight between the ship of the line, Jupiter and the French frigate, Preneuse
The Precursor
Amidst these political upheavals in Europe, all disaffected communities of the protagonists in the colonies sought assistance from their colonisers’ enemies. In other words, the ancient maxim that the enemies of one’s enemies are one’s friends applied. In the case of South Africa, this applied to the Boer settlements at Swellendam and Graaff-Reinet. Both held deeply felt grievances about stock theft and various other matters. Both had rebelled and established self-rule but these interludes were short-lived. With the colony changing from Dutch to English rule in 1792, discontent continued to simmer except now they sought succour from beyond the shores of the colony. This was the precursor to the first and only sea battle to be fought in Algoa Bay.

Raising suspicions
A number of maritime incidents evoked the spectre of an impending naval clash. The first arose in 1797 when the British man-o-war, Hope, intercepted the Dutch brig, the Haas, in Delagoa Bay. Suspicions were aroused when it was discovered that she was carrying arms, explosives and 45 fighting men believed to be bound for the Eastern Cape in support of the Graaff-Reinet rebels. To reinforce this suspicion, early in 1797 HMS Daedalus captured a French frigate Prudente off the east coast. She was reported to be carrying “300 volunteers, mostly vagabonds”. Again the suspicion fell on their possible destination with speculation being the Eastern Cape.
British reaction
With tensions and anxieties rising about a possible attack or annexation, in March 1799 the British despatched the HMS Star, which was renamed the HMS Hope, to Algoa Bay to land troops in order to protect their interests there. The men of the 91st Regiment were given this task. To this end, they built an earthen fort on Ferreira’s farm, Papenkuilsfontein. To provide additional manpower, Brigadier-General Thomas Pakenham Vandeleur came overland with more troops. This redoubt has subsequently been referred to as “Star Fort” even though this appellation was not used once during its occupation, despite letters being posted from it during this time.

Taking advantage of the unsettled situation, the Khoikhoi went on the rampage, attacking outlying farms, burning homesteads and plundering livestock. It was during one of these periodic forays into the Colony that Star Fort featured prominently in a daring enterprise. A huge body of black warriors – Khoikhoi and Xhosa – attacked Star Fort in broad daylight on the 10th August 1799, driving off cattle and sheep pastured outside the fort. The horses of the Dragoons were grazing some distance away. Hence it took a while before a pursuit could be organised once the attackers had herded the defenders’ animals away.
It was only when the raiders reached Kleinskool that the incensed Dragoons caught up with them. Accompanying them were two field pieces. Here the attackers had elected to savour some of their spoils of war by having a hearty meal; the ingredients had unwittingly been supplied by the troops’ own live stock. Caught unawares, forty of the attackers lay dead at the conclusion of the clash, while the rest of their erstwhile companions dispersed into the surrounding scrub and bush.
On the 19th August, the 24-gun transport ship, The Camel, formerly the 44-gun Mediator, sailed from Cape Town with a prefabricated blockhouse for 50 men. On board were 30 artificers whose role it was to erect it besides the Baakens lagoon at the mouth of the river. This blockhouse would be armed with two 3-pounders. The Camel was a worn-out 44, now used as a lowly transport. On the night of the 20th September 1799, it lay at anchor off North End beach accompanied by the 16-gun sloop, HMS Rattlesnake. The Camels’ artificers had now spent approximately a month erecting the fort besides the Baakens River. On shore, the commander of the British forces in the Cape, Major-General Charles Dundas supervised the erection of the wooden blockhouse. This interim measure was being undertaken in lieu of building a larger stone fort on the hill overlooking the Baakens river and lagoon.
The HMS Camel
The HMS Camel commenced life in 1782 as the fifth rate 44-gun HMS Mediator. In Britain’s Royal Navy during the classic age of fighting sail, a fifth rate was the penultimate class of warships in a hierarchical system of six “ratings” based on size and firepower.
As a fifth rate, she housed the 44 guns as follows:
- Lower gundeck: 20 × 18-pounder guns
- Upper gundeck: 22 × 9-pounder guns
- Forecastle: 2 × 6-pounder guns
In 1788, on conversion into a storeship, the HMS Mediator was renamed the HMS Camel and referred to as en flûte, a French naval expression of the Age of Sail to designate a warship used as a transport, with a reduced armament. Some warships, ships of the line or frigates, were occasionally used with limited artillery, by reducing the number and calibre of their guns. Since ships have a limited amount of cargo space, they may be armed en flûte to make room for other cargo, such as troops and ammunition. This reduces the ship’s ability to defend herself if attacked.
In the process, her armament was reduced from 44 to 24 guns as follows:
- Upper gundeck: 20 × 9-pounder guns
- Quarterdeck: 4 × 6-pounder guns
The HMS Camel saw important service in the French Revolutionary Wars, making several voyages to the fleets in the Mediterranean and serving under several officers who would become prominent in the navy. She also made trips further afield, returning to the West Indies on occasion, as well as making voyages to the Cape of Good Hope to deliver supplies to the armies there. It was during one such trip that she was involved in the naval engagement which is the subject of this blog . She spent her last days making voyages to the various hotspots around the globe, before being finally withdrawn from service and broken up in 1810.
Very little information can be found about HMS Rattlesnake except that the vessel involved in this incident was the third of eight warships to bear this name. This vessel, which entered service in 1791, was a 16-gun sloop. It ended its service 23 years later in 1814 when it was sold.
The engagement
Just prior to dusk – 4pm to be precise – on Friday 20th September 1799, a large ship, flying the Danish flag, entered into the Bay and headed south west towards the anchorage. A fresh wind blew from the east-south-east.
With their ships lying at anchor, probably off Papenkuilsfontein River, the two captains – John Lee of HMS Camel and Samuel Gooch of the HMS Rattlesnake – together with 30 and 15 respectively of their men, were ashore serving with the army. Not anticipating any imminent action, both vessels bobbed on the sea with their yards and topmasts down and their topgallant masts on deck. Being a transport vessel, the Camel carried stores for General Dundas.
This unknown frigate under Captain Jean-Marthe-Adrien L’Hermite, hoisted a Danish jack at her mizen peak. A local coastal schooner, the Surprise, heading out of the Bay, came within hailing distance of the new arrival. After what the captain heard and saw, he immediately scarpered back to shore in order to alert the Rattlesnake of impending trouble.
By 6pm, now nearly dark, the foreign frigate furled her sails. She was now within 800 yards of the Rattlesnake with her broadside bearing upon the latter’s starboard beam and bow. At the same time, the rowing guard from the Camel approached the unknown vessel. When this boat was nearly alongside, two men with cutlasses in their hands were observed getting out of the ship’s portholes. On this, and the additional discovery that the ship was a large frigate, the boat hastened back to the Camel with this intelligence.
Lt. William Fothergill, the senior officer aboard the Rattlesnake, alerted to a possible attack, ordered all to action stations. Moreover he instructed that a warning shot be fired from the Rattelsnake under the stern of the approaching ship. The Camel did likewise. No response was received from the intruder. Shortly after these shots at 6h30pm, the Camel’s boat reached the Rattlesnake with the intelligence about the intruder. Fothergill who had been placed in charge of both British vessels, communicated that the Camel should should hoist a light on her mizen peak when she was ready to engage. This process of clearing for action and getting springs on their cables took some time. Two hours later, at 8:30, even though the Camel had not given the signal that it was ready, Lieutenant Fothergill aboard the Rattlesnake, was becoming ever more anxious. The reason for this concern was that the frigate had veered away until it was 500 yards from the two British vessels. As he suspected that she intended to board the Rattlesnake, Fothergill got the broadside of the latter to bear on the French frigate and immediately opened fire on it. The Camel quickly did the same. Towards 9 p.m., this unknown vessel, the Preneuse, substituted a French ensign for the Danish jack, and returned the fire of her two opponents, but directed nearly the whole of her guns at the Camel.
In this way, the action continued until midnight. When the wind suddenly shifted to north-west, the three ships canted, whereby the Camel, in order to bring her broadside to bear again, was obliged to slip her small-bower cables and veer to two cables on the best bower. Scarcely had this been done, when the carpenter reported that, from a shot received under the magazine, the ship had six feet of water in the hold and was taking in more. As a consequence of this, the Camel’s crew broke off from manning the guns and instead manned the pumps.
Surmising that the suspension of fire on the part of the Camel was due to having effectively silenced her, Captain L’Hermite of the Preneuse now devoted his principal attention to the Rattlesnake. The Preneuse continued this heavy cannonade until 3:30am on the 21st. To the surprise of the British, the French frigate then ceased firing. After cutting her cable, she sailed off before the wind towards Bird Island. Here she anchored again until just prior to 10am before once again setting sail using her main topsail only.
The Camel listed amongst the damages that she had sustained were to her fore and mizen masts, the main yard and the main topsail yard. In addition, the rigging had been cut in various places as well as her hull having been struck in numerous locations. Notwithstanding this level of physical damage sustained, of the 101 men and boys on board, only six had been wounded. Meanwhile the Rattlesnake had also experienced damage. The main and mizen masts, main topmast and the bowsprit had been damaged and eight holes shot in it. Of the 92 crew on board, the carpenter and a seaman were killed as well as six or seven others lightly wounded.
According to Redgrave, “Troops were marched to the beach and arrayed ready to frustrate any attempt to land should the Frenchmen win the battle. At least they had a fine view of the cannonade which leapt and flashed scarlet flame across the sea”.
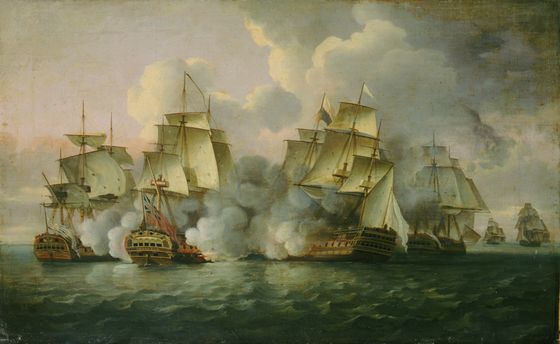
It was a ruse that finally decided the issue. Three long 3-pounders and two 9-pounders, mounted on carriages, lay at the Fort. They were hurriedly loaded onto wagons and transported to the shore below Fort Frederick. Here the soldiers heaped up sand to resemble fortifications. It was herein that the five guns were emplaced. When they were fired in the darkness, they made a huge clamour, and even though they fell harmlessly short, they created an impression for the French commander that Algoa Bay was too heavily fortified.

Three men lay dead – the carpenter, John Drew, the quartermaster, William Barter and seaman, Jasper Keaping. Fourteen others, mainly from the Rattlesnake, were wounded. According to reports, the heavily outgunned British ships should have been blown out of the water. Apart from the distraction by the guns on the beach, the sailors aboard the British vessels, who were mainly of Dutch extraction, had put up a “most gallant and active fight” in spite of the damage that they had suffered.
Fearing that the raider might return, Dundas immediately dispatched a rider to summon help from the Cape. Several men-o-war lying in Simon’s Bay were ordered to sea to search for the attacker. HMS Jupiter sighted the crippled ship off the Great Fish River but was unable to engage her. Finally, only on the 11th December 1799, did the HMS Adamant and HMS Tremendous manage to close in on their foe off Mauritius. Immediately then went into attack mode. According to Colin Urquhart, “Realising [that] he was unable to escape, he captain ran her charge ashore. It was only then that the British were able to identify their quarry as the 44-gun French frigate Preneuse of the Mauritius squadron, commanded by the notable Indian Ocean fighting sailor, Captain L’Hermite. He, several officers and members of the crew who had been unable to escape, were taken prisoner and the Preneuse was set on fire.”
The Camel and the Rattlesnake returned to the Cape for repairs before heading home.
En passant
Ultimately when Fort Frederick was constructed, it was fitted with two 8- pounders. Since that day, however, no shot has ever been fired in anger from within the walls of the Fort. Taking into account its distance from the shore, this is not surprising as it is highly unlikely that a shot fired from Fort Frederick would have reached the beach let alone a vessel at sea.

Sources
Port Elizabeth: A Social Chronicle to the end of 1945 by Margaret Harradine (1996, E H Walton Packaging Pty Ltd, Port Elizabeth)
Port Elizabeth in Bygone Days by J.J. Redgrave (1947, Rustica Press)
Algoa Bay – In the Age of Sail (1488 to 1917) by Colin Urquhart (2007, Bluecliff Publishing, Port Elizabeth)
The Naval History of Great Britain – Vol 2 http://www.pbenyon.plus.com/Naval_History/Vol_II/P_346.html
1 Comment